Introduction
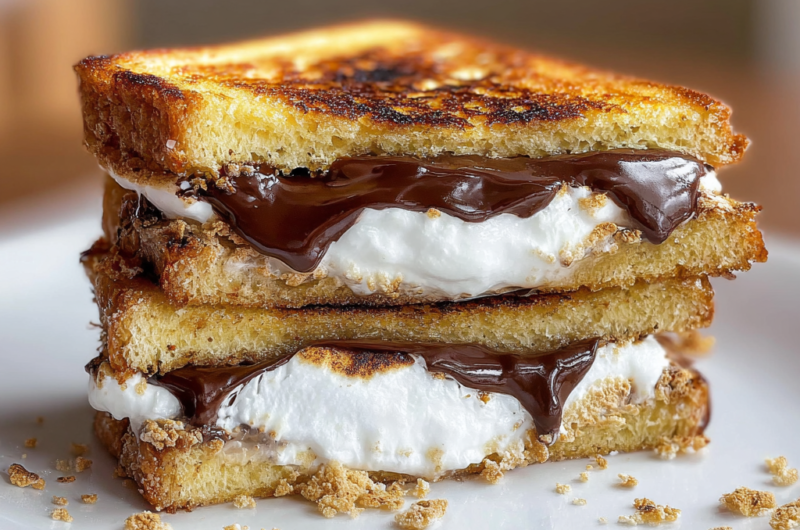
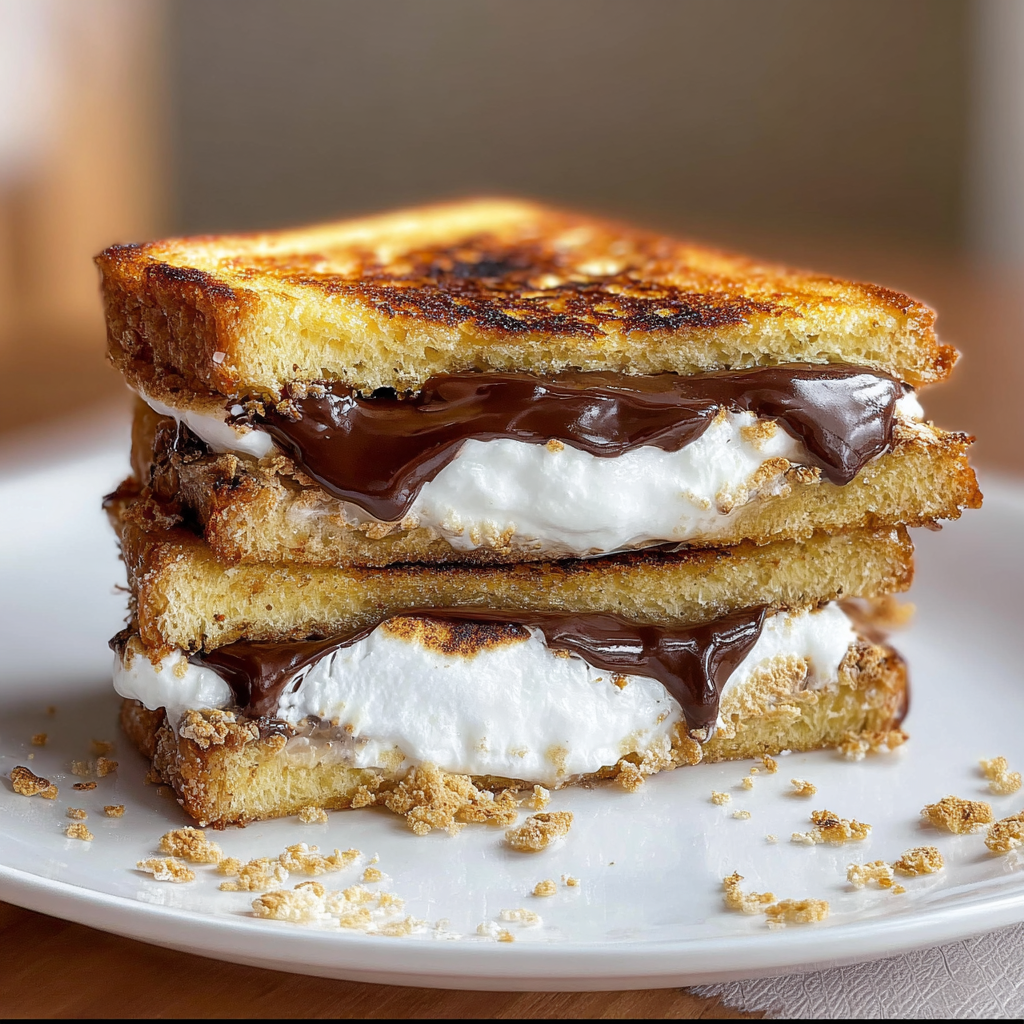
Fried s’mores sandwiches take the campfire classic to an entirely new level. Imagine biting into melted chocolate and gooey marshmallow, all hugged by warm, crispy bread. This delightful treat combines the flavor of s’mores with the comforting crunch of fried dough, making it perfect for a sweet indulgence whether it’s a cozy night in or a gathering with friends.
The beauty of this recipe lies in its simplicity and customizability. With just a few basic ingredients, you can create a dessert that will wow your taste buds. Get ready to impress family and friends with this twist on a classic favorite, turning an ordinary sweet into an extraordinary experience.
Ingredients
- 4 slices of bread
Opt for a thick, hearty bread like brioche or Texas toast for a sturdy base. The bread's role is crucial as it provides structure, holding the oozing filling together while also contributing to a satisfying crunch when fried. - 2 ounces chocolate (milk or dark)
Chocolate is the heart of any s’mores creation. It melts beautifully when heated, providing that rich sweetness which balances the toasted marshmallow. Choose your favorite variety to personalize the experience. - 1 cup marshmallows (mini or regular)
Marshmallows lend a chewy, gooey texture that is essential to the s'mores flavor. When heated, they expand and become delightfully sticky, creating that iconic mouthfeel associated with traditional s'mores. - 1/2 cup all-purpose flour
Flour serves as a base for the batter that envelops the sandwich during frying. It aids in creating a crispy outer layer while sealing in the filling, preventing leaks and enhancing overall flavor. - 1/2 teaspoon baking powder
Baking powder is important for achieving a light, airy texture in the fried coating. It encourages the batter to rise slightly while frying, creating a perfectly balanced bite that isn't too heavy. - 1/4 teaspoon salt
Salt enhances the overall flavor profile of the dish, bringing out the sweetness of the chocolate and the richness of the marshmallows. It ensures that each bite is deliciously balanced. - 1/2 cup milk
Milk hydrates the flour, creating a smooth batter while adding a touch of creaminess. It helps in achieving the right consistency, crucial for a successful frying process. - 1 egg
Eggs enrich the batter, adding depth of flavor and improving texture. They help bind the ingredients together, ensuring a cohesive coating that sticks during frying. - Vegetable oil (for frying)
Oil is necessary for frying the sandwiches to crispy perfection. It facilitates even cooking and browning, creating that irresistible crust that contrasts with the melty filling. - Powdered sugar (optional, for dusting)
Powdered sugar adds a final touch of sweetness and visual appeal. Dusting over the finished product elevates its presentation and is an inviting sign of decadence.
Directions & Preparation
Step 1: Prepare the Sandwich Filling
Begin by layering the chocolate and marshmallows between two slices of bread. Place the chocolate on one slice, then add a generous helping of marshmallows. Top with another slice to form a sandwich. This step is vital as the arrangement of the filling ensures that the flavors meld together perfectly during cooking.
Step 2: Prepare the Batter
In a mixing bowl, combine flour, baking powder, salt, milk, and egg, stirring until smooth. The batter should have a thick consistency that can perfectly coat the sandwich without being overly runny. This texture is crucial to create a crispy exterior while keeping the filling unscathed.
Step 3: Heat the Oil
In a deep skillet or fryer, heat about 2 inches of vegetable oil over medium heat until it reaches about 350°F (175°C). It is important to use a thermometer to ensure the oil is at the right temperature; too low and the sandwich will absorb too much oil, too high and it may burn before cooking through.
Step 4: Dip the Sandwich
Carefully dip the prepared sandwich into the batter, ensuring it's completely coated. This step provides that signature fried exterior. Make sure to let any excess batter drip off before frying; too much batter can lead to soggy results and an uneven cook.
Step 5: Fry the Sandwich
Gently place the coated sandwich in the hot oil. Fry for 2-3 minutes on each side, or until golden brown. Watch as it bubbles and crisps, transforming into a decadent treat. This is where the magic happens, creating a crispy outer layer while warming the filling inside.
Step 6: Drain and Cool
Once fried, remove the sandwich and drain on paper towels to absorb excess oil. This step is essential to avoid a greasy bite. Let it cool slightly; the filling will be extremely hot and needs time to settle.
Step 7: Serve and Enjoy
Dust the fried s’mores sandwich with powdered sugar and cut it in half to reveal the gooey interior. Serve immediately while warm to experience the full melty goodness. This final step is key for enjoying the treat at its absolute best, ensuring each bite is as delicious as it should be.

Choosing the Right Bread
The choice of bread significantly influences the final outcome of your fried s’mores sandwich. A thick bread like brioche or even bagels can provide enough strength to hold the filling and crunch, while also contributing unique flavors. Explore different breads to find one that enhances your experience; each type can add a delightful twist to your creation.
Variations on the Classic
While the traditional chocolate and marshmallow filling captures the essence of a s’more, feel free to get creative. Incorporate flavors like peanut butter, caramel sauce, or even nut butters for a twist. You can also swap in flavored chocolates or different types of marshmallows such as caramel or strawberry, allowing you to tailor the recipe to your personal preferences.
Perfecting the Fry
Frying is an art, and perfecting this technique can take your sandwich to the next level. Maintaining the right oil temperature is crucial; too hot will burn the batter while too cold will leave it soggy. Always use enough oil to fully submerge the sandwich for even cooking, and don’t overcrowd the pan to ensure consistent heat distribution.
FAQs
What if the batter is too thick?
If your batter is too thick, gradually add a small amount of milk until you reach the desired consistency. It should be thick enough to coat the sandwich without dripping excessively but still pourable.
Can I use a different type of chocolate?
Absolutely! Feel free to experiment with different types of chocolate such as dark, white, or flavored varieties. Each type will impart its unique flavor and change the overall profile of your sandwich.
Why is my sandwich leaking filling?
If your sandwich leaks filling while frying, it may be due to using too little batter or not sealing the edges properly. Ensure that the batter fully coats the sandwich and press the edges together firmly before frying.
How do I know when the sandwich is done frying?
The sandwich is done frying when it is golden brown and crispy on the outside. You can gently lift it to check the color, and a good visual cue is bubbles forming around the edges.
What if I'm out of marshmallows?
If you don't have marshmallows on hand, you may substitute with marshmallow fluff or even melted chocolate spread for a similar flavor. Just be aware that the texture will be different.
Can I use gluten-free flour for this recipe?
Yes, you can substitute regular flour with a gluten-free blend. Just be sure to check the blend’s characteristics to ensure it performs similarly when fried.
Conclusion
Fried s’mores sandwiches are a delightful creation that blends nostalgia with indulgence. They are easy to make and offer endless opportunities for creativity with fillings and breads. Whether you’re enjoying them as an after-dinner treat or a fun dessert for a gathering, they are sure to bring joy to everyone who takes a bite.
So gather your ingredients, unleash your culinary creativity, and dive into the decadence of fried s’mores. Each bite promises to be a memorable experience that showcases the comfort and joy of homemade sweets.
Recipe Card
Indulgent Fried S’mores Sandwich Recipe at Home
Ingredients
Method
- Prepare the Sandwich Filling
- Prepare the Batter
- Heat the Oil
- Dip the Sandwich
- Fry the Sandwich
- Drain and Cool
- Serve and Enjoy
Notes
Additional serving suggestions: pair with a crisp salad, garlic bread, or roasted seasonal vegetables for balance.
For make-ahead, prep components separately and assemble just before heating to preserve texture.
Taste and adjust with acid (lemon/vinegar) and salt right at the end to wake up flavors.